

Changes will be made to the 2024-2025 FAFSA as a part of the FAFSA Simplification Act. The purpose of these changes is to modernize the FAFSA process, making it easier and faster to file, while maximizing the aid available for every student.
The FAFSA priority has been Updated Now to March 15, 2024. You can start by making sure you have an FSA ID and are able to log in to the Federal Student Aid website. You will need an FSA ID to be able to submit the FAFSA.
Applying for financial aid can seem complicated for students and their families, but the Office of Financial Aid at Rutgers University is eager to guide you through the process. Learn more about how you–the parent–can help your student navigate their financial options through the step-by-step guide provided by the U.S. Department of Education.
While the Free Application for Federal Student Aid (FAFSA®) form is the student’s application, we know that families often play a large role in the process. While we recommend that the student start their own FAFSA form, we know that’s not always what happens. With that in mind, we wanted to provide instructions for families who are starting the FAFSA form on behalf of their child so you can avoid running into issues completing the form. Please do not attempt to complete the 2023-2024 FAFSA for the 2024-2025 academic year.
Before you begin. Do you need to fill out the FAFSA® for more than one child? Please fill the form for one student and then note the instructions at the end of Step 8.
Step 1: Create an FSA ID
An FSA ID is a username and password you use on Federal Student Aid websites such as fafsa.gov and StudentLoans.gov. If your child is considered a dependent student, two unique FSA IDs are needed to complete the FAFSA form online:
- Parent’s FSA ID
- Student’s FSA ID
We recommend that you and your child register for FSA IDs ahead of time, so you don’t experience delays later in the process.
Your FSA ID serves as your legal electronic signature throughout the federal student aid process. Do not share your FSA ID with anyone, not even your child. Your child should also not share his or her FSA ID with you. Keep your FSA ID information in a safe place. You’ll need it to renew your FAFSA form each year and to access federal student aid information online.
Step 2: Start the FAFSA® form at fafsa.gov
- Go to https://studentaid.gov/h/apply-for-aid/fafsa and click “Start A New FAFSA.”
- Were you given the option to submit a FAFSA® Renewal? If your child is present, you should choose this option. If you do, a lot of the demographic information required will be pre-populated (information you entered the first time you filled out the FAFSA transfer to your new application to save you time. You can now edit information if any of it has changed within the year). Your child must be present because they will need to enter the student’s FSA ID to continue. If your child is not present, you should “Start A New FAFSA.”
- Once on the log-in page, you will see two options. If you are starting the FAFSA form on behalf of your child, choose the option on the right, “Enter the student’s information.” Do not choose the option on the left, “Enter your (the student’s) FSA ID.”
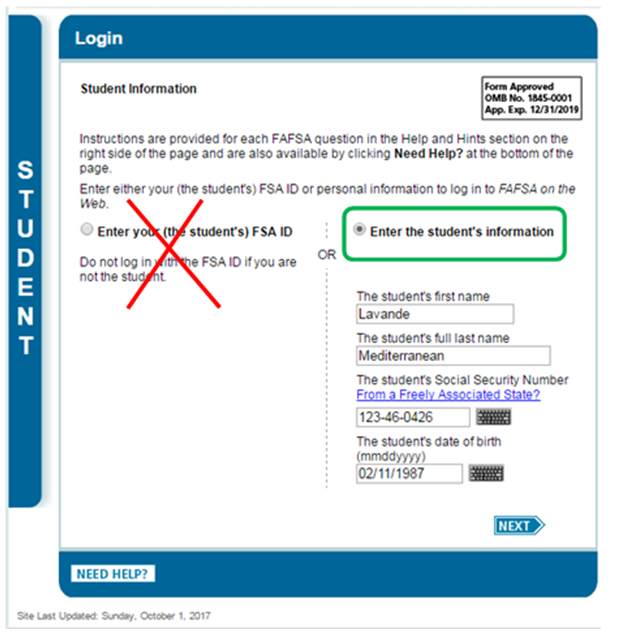
- Enter your student’s name, Social Security number, and date of birth. Then, click next.
- Choose which FAFSA form you’d like to complete.
- The 2024-2025 FAFSA will not be available until December 2023. Please do not attempt to complete the 2023-2024 FAFSA for the 2024-2025 academic year.
- Create a save key. A save key is a temporary password that allows you and your child to “pass” the FAFSA form back and forth. It also allows you to save your child’s FAFSA form and return to it later. Once you create a save key, share it with your child. He or she will need it to complete later steps.
IMPORTANT: The FAFSA® form is the student’s application, not yours. When the FAFSA form says “you” or “your,” it’s referring to the student. Pay attention to whether you’re being asked for student or parent information. When in doubt, the banner on the left side will indicate whether you’re on a student (blue) page or parent (purple) page.
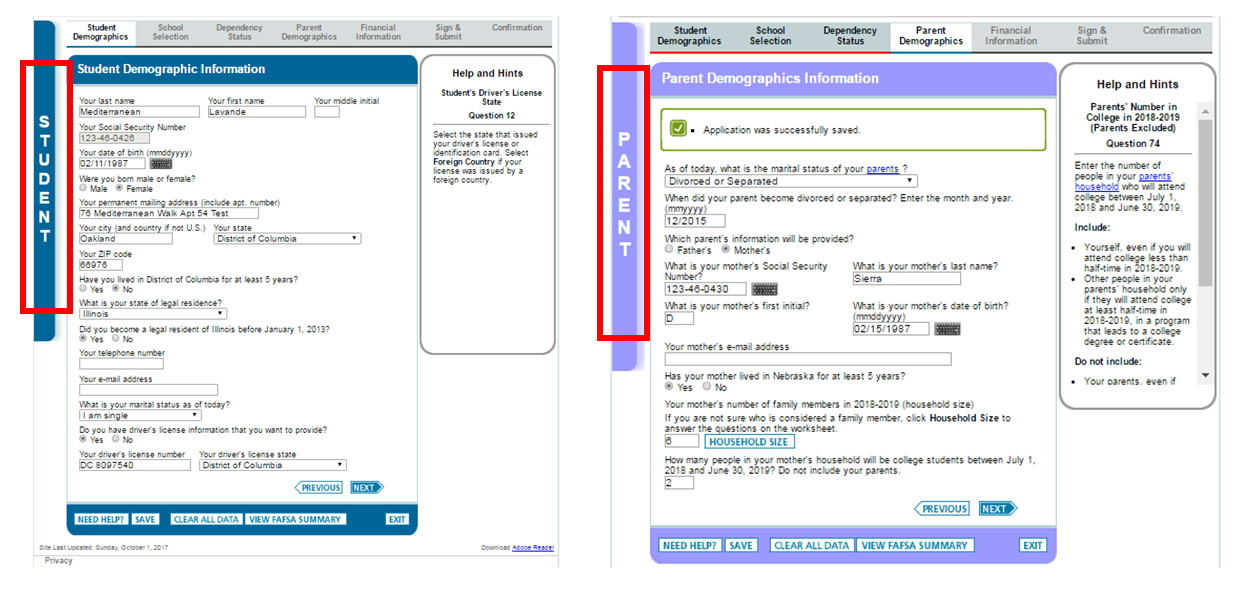
Step 3: Fill out the Student Demographics Section
Here’s where you’ll enter basic demographic information about your child, such as name, date of birth, etc. If you chose the FAFSA renewal option in step one, a lot of his or her personal information will be pre-populated to save you time. Make sure you enter your child’s personal information exactly as it appears on his or her Social Security card so you don’t encounter any errors. (That’s right, no nicknames.)
Step 4: List the schools to which you want your FAFSA® information sent
In the School Selection section, you’ll add all the schools you want to receive your child’s information. It is important that you add every school your child is considering, even if he or she hasn’t applied or been accepted yet. It doesn’t hurt to add more schools; colleges can’t see the other schools that have been added. In fact, you don’t even have to remove schools if your child later decides not to apply or attend. If your child doesn’t end up applying or getting accepted to a school, the school can just disregard his or her FAFSA form.
Rutgers School Code: 002629
Step 5: Answer the dependency status questions
In this section, you’ll be asked a series of specific questions to determine whether or not your child is required to provide your (parent) information on the FAFSA form.
- These dependency guidelines are set by Congress and are different from those used by the Internal Revenue Service (IRS).
- Even if your child doesn’t live with you, supports him or herself, and files taxes separately from you, he or she may still be considered a dependent student for federal student aid purposes.
- If your child is determined to be a dependent student, he or she will be required to report information about you. If your child is determined to be an independent student, you can skip step six.
Step 6: Fill out the Parent Demographics section
This is where you’ll provide your own demographic information.
Are you divorced? Remarried? Here’s a guide to determining which parent’s information needs to be included on your child’s FAFSA form:
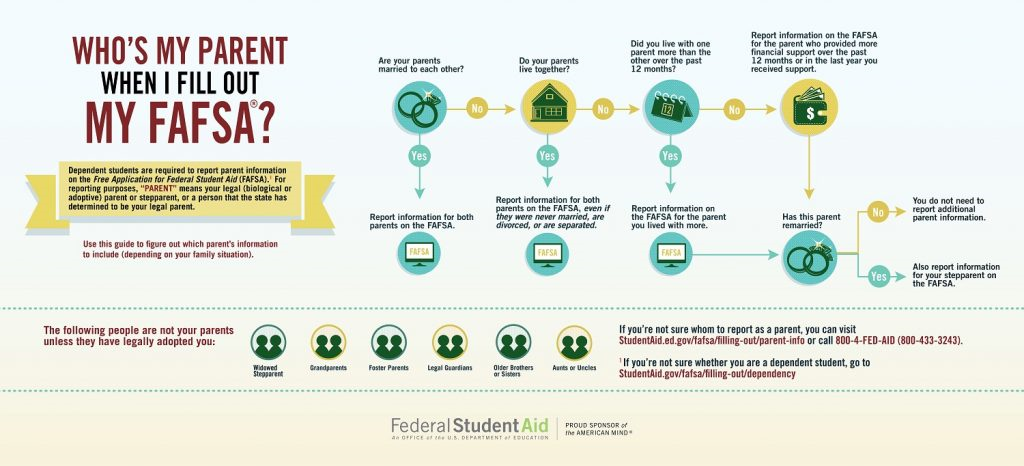
For specific guidance, visit the “Reporting Parent Information” page on StudentAid.gov.
Step 7: Supply your financial information
In this section, you’ll first be asked to provide parent financial information. This step is incredibly simple if you use the IRS Data Retrieval Tool (DRT). The IRS DRT allows you to import your IRS tax information into the FAFSA form with just a few clicks. Using this tool also may reduce the amount of paperwork you need to provide to your child’s school. So if you’re eligible, use it!
To access the tool, indicate that you’ve “already completed” taxes on the parent finances page. If you’re eligible, you’ll see an option to “Link to IRS.” Choose that option and follow the prompts.
Next, you’ll likely be asked to provide your child’s financial information.
- If your child filed taxes, the easiest way to complete this section is to use the IRS DRT. Your child would need to be present because he or she needs to provide his or her FSA ID to use the tool. If your child is not present, save and exit the application and instruct your child to log in with his or her FSA ID, retrieve the FAFSA form using the save key, and then use the IRS DRT to complete the FAFSA form and sign it.
- If your child did not file taxes, you can enter his or her financial information manually (if you have access to the required information). If you don’t have access to the information, save and exit the application and instruct your child to log in with his or her FSA ID, retrieve the FAFSA form using the save key, complete the FAFSA form, and sign it.
NOTE: If you need to save and exit your dependent child’s FAFSA form so he or she can complete the remaining information, you’ll need to log back in and sign your child’s FAFSA form before your child can submit it.
Step 8: Sign your child’s FAFSA® form
You’re not finished with the FAFSA form until you and your child sign it. The quickest and easiest way to sign your child’s FAFSA form is online with your FSA ID. If your child is not present, after you sign your child’s FAFSA form with your FSA ID, save and exit the application and instruct your child to log into fafsa.gov to sign and submit his or her FAFSA form.
NOTE: If you have multiple children who need to complete the FAFSA form, you can use the same FSA ID to sign FAFSA forms for all of your children. You can also transfer your information into your other children’s applications by choosing the option provided on the FAFSA confirmation page.
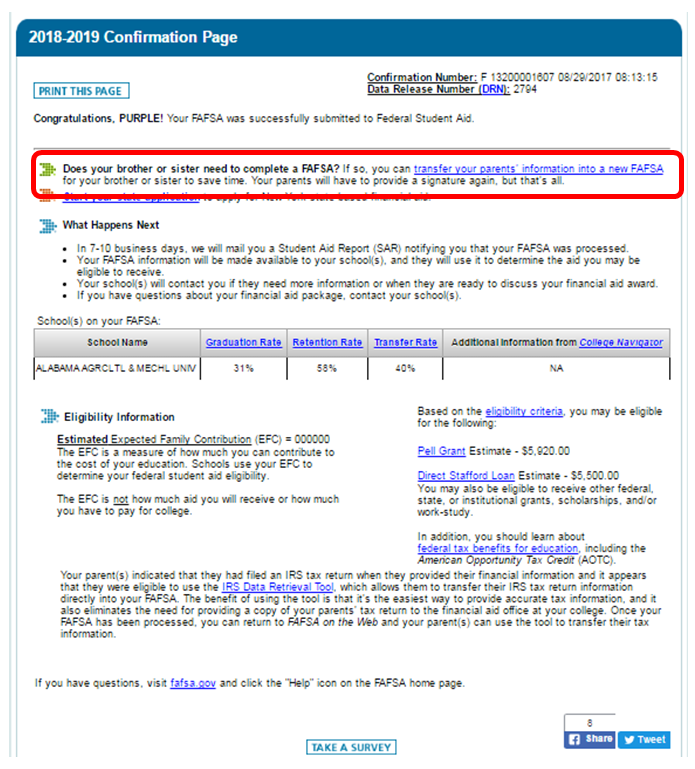
Congratulations on completing the FAFSA®! Your child is one step closer to getting money for college.